

If you want to open an OpenGL window, most of tutorials and books will tell you to use GLFW, FreeGLUT or SDL framework. Just call glfwInit(), glfwCreateWindow() and you are done. However, if you need to write a size-limited executable or simply don’t want to create another dependency, you have to take care of this by yourself. This is how to do it “the hard way”.
Normally, as with most of the libraries, you would #include <gl.h>, add opengl32.lib to linker dependencies and just use all the features of the modern OpenGL in your program, maybe with some kind of additional glInit() call. Well, let me tell you something my friend: “One does not simply initialize OpenGL”.
“It’s complicated”
Due to various historical events like John Carmack’s letter that favoured OpenGL over Direct3D, Alex St. John’s responses and later Microsoft’s campaign against OpenGL in favour to their proprietary library, things got a bit complicated.
In 2003, Microsoft left the OpenGL Architecture Review Board, and in 2005 at SIGGRAPH they suggested that they will remove support for OpenGL from Windows Vista, keeping just an emulation layer on top of DirectX only for back-compatibility with Windows XP software. In 2006, members of the Khronos Group (like NVIDIA and AMD) announced that they will support OpenGL using installable client drivers (ICD).
As a result of these API wars, Windows installations include only version 1.1 of OpenGL library. You have to install graphics card drivers from NVIDIA, AMD or Intel to enable access to newer version’s features.
The same goes for include files. Windows SDK provides gl.h for version 1.1. To use modern functions, you also need to add glext.h and wglext.h from the Khronos’ OpenGL registry.
To gain access to newer functions, you must load their pointers manually at runtime. This can be done with wglGetProcAddress() function from version 1.1 of opengl32.dll library. There are OpenGL loading libraries such as GLEW or GL3W to save you the trouble.
To create a context, you must first create a context
Before getting functions pointers or issuing OpenGL commands, you have to create an OpenGL rendering context. You should start with creating a window with CreateWindow() and use its handle to get Device Context with GetDC(). Next, pick a hardware accelerated pixel format with ChoosePixelFormat() and associate it with Device Context using SetPixelFormat(). Then you can create Rendering Context with wglCreateContext() and set it as current with wglMakeCurrent(). Load new OpenGL functions with wglGetProcAddress() and you are ready to use them.
The problem with old ChoosePixelFormat() and wglCreateContext() is that they are not extensible. For example, the first one uses fixed PIXELFORMATDESCRIPTOR structure and there is no field you could set to indicate that you want to request multisampling, sRGB format or floating-point framebuffer support. Using the later one, you cannot ask for specific OpenGL profile or version.
To remedy this, new functions have been created, namely wglChoosePixelFormatARB() and wglCreateContextAttribsARB(). Both of them accepts lists of attributes, so they can support any number of options. There is a small problem, though. To create a rendering context using them, you have to get their function pointers, and for this, you need a rendering context.
Luckily, this can be solved by creating a dummy window and context with old functions, getting new function pointers and creating window and context in the desired format.
Let’s do it
First, make sure you have glext.h and wglext.h from the Khronos’ OpenGL registry. You can put them in your project’s folder or copy to gl.h location in Windows SDK.
#include "Window.h"
#include <gl/gl.h>
#include "gl/glext.h"
#include "gl/wglext.h"
If you decide to use a library for loading OpenGL functions, these includes will be replaced with one from that library.
We need to register a class for our window. It’s important to set correct style here. CS_HREDRAW and CS_VREDRAW indicate that we want to redraw the entire window if a movement or size adjustment will occur, and CS_OWNDC will get us a unique device context for each window in the class.
ATOM registerClass(HINSTANCE hInstance) {
    WNDCLASSEX wcex;
    ZeroMemory(&wcex, sizeof(wcex));
    wcex.cbSize = sizeof(wcex);
    wcex.style = CS_HREDRAW | CS_VREDRAW | CS_OWNDC;
    wcex.lpfnWndProc = WindowProcedure;
    wcex.hInstance = hInstance;
    wcex.hCursor = LoadCursor(NULL, IDC_ARROW);
    wcex.lpszClassName = "Core";
    return RegisterClassEx(&wcex);
}
For WindowProcedure you can use any simple callback function like:
LRESULT CALLBACK WindowProcedure(HWND hWnd, UINT message, WPARAM wParam, LPARAM lParam) {
	switch (message) {
		case WM_KEYDOWN:
			if (wParam == VK_ESCAPE) {
				PostQuitMessage(0);
			}
			break;
		case WM_CLOSE:
			PostQuitMessage(0);
			break;
		default:
			return DefWindowProc(hWnd, message, wParam, lParam);
	}
	return 0;		// message handled
}
We are ready to create our temporary window and a device context:
HWND fakeWND = CreateWindow("Core", "Fake Window",      // window class, title
		WS_CLIPSIBLINGS | WS_CLIPCHILDREN, // style
		0, 0,			// position x, y
		1, 1,			// width, height
		NULL, NULL,		// parent window, menu
		hInstance, NULL);       // instance, param
HDC fakeDC = GetDC(fakeWND);        // Device Context
Let’s choose a suitable pixel format. Again, it’s important to set correct flags, so we will get a hardware accelerated format.
PIXELFORMATDESCRIPTOR fakePFD;
ZeroMemory(&fakePFD, sizeof(fakePFD));
fakePFD.nSize = sizeof(fakePFD);
fakePFD.nVersion = 1;
fakePFD.dwFlags = PFD_DRAW_TO_WINDOW | PFD_SUPPORT_OPENGL | PFD_DOUBLEBUFFER;
fakePFD.iPixelType = PFD_TYPE_RGBA;
fakePFD.cColorBits = 32;
fakePFD.cAlphaBits = 8;
fakePFD.cDepthBits = 24;

int fakePFDID = ChoosePixelFormat(fakeDC, &fakePFD);
if (fakePFDID == 0) {
	showMessage("ChoosePixelFormat() failed.");
	return 1;
}
If everything went well, we can associate its ID with our device context:
if (SetPixelFormat(fakeDC, fakePFDID, &fakePFD) == false) {
	showMessage("SetPixelFormat() failed.");
	return 1;
}
Finally, we can create temporary rendering context and make it current:
HGLRC fakeRC = wglCreateContext(fakeDC);	// Rendering Contex
if (fakeRC == 0) {
	showMessage("wglCreateContext() failed.");
	return 1;
}
if (wglMakeCurrent(fakeDC, fakeRC) == false) {
	showMessage("wglMakeCurrent() failed.");
	return 1;
}
We can get pointers to modern OpenGL functions now. Prepare for some nasty-looking code!
PFNWGLCHOOSEPIXELFORMATARBPROC wglChoosePixelFormatARB = nullptr;
wglChoosePixelFormatARB = reinterpret_cast<PFNWGLCHOOSEPIXELFORMATARBPROC>(wglGetProcAddress("wglChoosePixelFormatARB"));
if (wglChoosePixelFormatARB == nullptr) {
	showMessage("wglGetProcAddress() failed.");
	return 1;
}
PFNWGLCREATECONTEXTATTRIBSARBPROC wglCreateContextAttribsARB = nullptr;
wglCreateContextAttribsARB = reinterpret_cast<PFNWGLCREATECONTEXTATTRIBSARBPROC>(wglGetProcAddress("wglCreateContextAttribsARB"));
if (wglCreateContextAttribsARB == nullptr) {
	showMessage("wglGetProcAddress() failed.");
	return 1;
}
…and now we are able to call wglChoosePixelFormatARB() and wglCreateContextAttribsARB(). Repeat this for every function you will need. Or save your time for some creative activity and use one of OpenGL Loading Libraries.
Whoa, we’re halfway there… Let’s repeat the process, this time for real, using modern OpenGL functions. Our window:
WND = CreateWindow(
	"Core", "OpenGL Window",       // class name, window name
	WS_CAPTION | WS_SYSMENU | WS_CLIPSIBLINGS | WS_CLIPCHILDREN, // style
	config.posX, config.posY,      // posx, posy
	config.width, config.height,   // width, height
	NULL, NULL,                    // parent window, menu
	hInstance, NULL);              // instance, param
	DC = GetDC(WND);
You may ask why we need to create another window, why not just use a “real” one from the start? Well, that would be a good idea, but there is a catch: you can assign pixel format to a window exactly once. Because we are going to use advanced pixel format that you cannot get with standard functions, we have to get a fresh window too.
Let’s choose a suitable pixel format. Notice that we can now request multisampling.
	const int pixelAttribs[] = {
		WGL_DRAW_TO_WINDOW_ARB, GL_TRUE,
		WGL_SUPPORT_OPENGL_ARB, GL_TRUE,
		WGL_DOUBLE_BUFFER_ARB, GL_TRUE,
		WGL_PIXEL_TYPE_ARB, WGL_TYPE_RGBA_ARB,
		WGL_ACCELERATION_ARB, WGL_FULL_ACCELERATION_ARB,
		WGL_COLOR_BITS_ARB, 32,
		WGL_ALPHA_BITS_ARB, 8,
		WGL_DEPTH_BITS_ARB, 24,
		WGL_STENCIL_BITS_ARB, 8,
		WGL_SAMPLE_BUFFERS_ARB, GL_TRUE,
		WGL_SAMPLES_ARB, 4,
		0
	};
	int pixelFormatID; UINT numFormats;
	bool status = wglChoosePixelFormatARB(DC, pixelAttribs, NULL, 1, &pixelFormatID, &numFormats);
	if (status == false || numFormats == 0) {
		showMessage("wglChoosePixelFormatARB() failed.");
		return 1;
	}
Even if we have a new ID for a pixel format, the standard SetPixelFormat() function still requires this old PIXELFORMATDESCRIPTOR structure from us. Let’s create it from pixel format ID.
PIXELFORMATDESCRIPTOR PFD;
DescribePixelFormat(DC, pixelFormatID, sizeof(PFD), &PFD);
SetPixelFormat(DC, pixelFormatID, &PFD);
Time to create our real OpenGL rendering context. This time we can request a minimal supported version of the library and choose core or compatibility profile.
const int major_min = 4, minor_min = 5;
int  contextAttribs[] = {
	WGL_CONTEXT_MAJOR_VERSION_ARB, major_min,
	WGL_CONTEXT_MINOR_VERSION_ARB, minor_min,
	WGL_CONTEXT_PROFILE_MASK_ARB, WGL_CONTEXT_CORE_PROFILE_BIT_ARB,
	0
};
RC = wglCreateContextAttribsARB(DC, 0, contextAttribs);
if (RC == NULL) {
	showMessage("wglCreateContextAttribsARB() failed.");
	return 1;
}
Time to say goodbye to our temporary rendering context, device context and window. Let’s make the new rendering context a current one.
wglMakeCurrent(NULL, NULL);
wglDeleteContext(fakeRC);
ReleaseDC(fakeWND, fakeDC);
DestroyWindow(fakeWND);
if (!wglMakeCurrent(DC, RC)) {
	showMessage("wglMakeCurrent() failed.");
	return 1;
}
If you want some extra safety, you should initialize OpenGL loading library here, and not in temporary context. That’s because MSDN documentation for wglGetProcAddress() states that function pointers may be context-dependent.
On the other hand, the OpenGL Wiki says that “in practice, if two contexts come from the same vendor and refer to the same GPU, then the function pointers pulled from one context will work in the other.”
So, are you ready for the final step? Let’s set a new window title to OpenGL version and show it:
SetWindowText(WND, (LPCSTR)glGetString(GL_VERSION));
ShowWindow(WND, nCmdShow);
To verify that you can issue OpenGL commands, set a default background colour, clear the window and swap the frame buffer:
glClearColor(0.129f, 0.586f, 0.949f, 1.0f);	// rgb(33,150,243)
glClear(GL_COLOR_BUFFER_BIT);
SwapBuffers(DC);
Depending on your graphics card, you should see something like this:

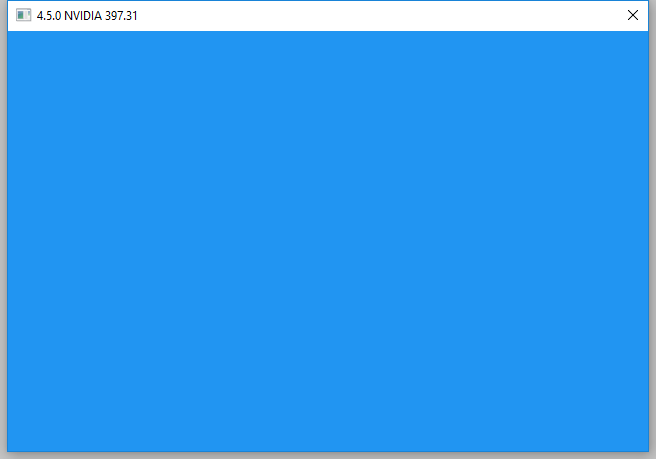
Notice that the requested client area size was 640×420, but the window area is actually 656×459. If you want to use windowed mode, you should call AdjustWindowRect() function to enlarge width and height before you pass them to CreateWindow(). Otherwise, you will get smaller client area (and possible unwanted scaling), as some of it will be used for a title bar, border and outer shadow.
Summary
Initialization of the modern OpenGL might be a bit complicated, but once you know how to do it, it shouldn’t be a problem for you.
Pros of doing this yourself: the footprint of this executable should be significantly smaller than a size of any popular framework (so you are ready to create an 64 kB intro :). You know what’s going on behind the scenes and can make your own adjustments. Cons: to make this multi-platform, you have to write separate versions for other systems.
You can get the full source code from the GitHub repository.