Intel NUC NUC7i3BNH Mini PC Review
Sometimes you have to replace your old PC with a better one. Nowadays, you can find models that are not only fast but also much smaller and more energy-efficient. This is a review of such a tiny but quite a powerful PC.
Note: this article is not sponsored. I purchased all the items with my own money.
What is Intel NUC?
Intel NUC (Next Unit of Computing) is a mini PC that has enough power to be used as everyday use PC, multimedia center or home server and in the same time is much smaller than typical PC tower case. It’s also more energy-efficient.
There are many different models to choose from. Some NUCs are ready to use out of the box. You can also choose a barebone model and buy any compatible RAM, SSD or HDD separately, then install Windows or Linux system on it. Some models have an extra bay for 2.5″ SSD or HDD drive too.
Finally, there are units dedicated for gaming or heavy duty work. “Skull Canyon” and its successor “Hades Canyon” are equipped with i7 processors and powerful GPUs, but it’s still possible to put them in a backpack and go to a LAN or demoscene party (but make sure you will have a monitor to connect it to).
The model I’m going to review is equipped with Intel Core i3-7100U. Units with Celeron, Pentium, Core i5 and Core i7 CPUs are also available. This is the 7th generation of the processors and models with 8th generation Celeron and Pentium are already available. The rest of the line-up should be available in Q3 2018.
The upcoming units will feature Coffee Lake chips that are faster, but also have higher power consumption (15 W vs. 28 W). If you are interested, look for models like NUC8i3BEH (Core i3-8109U), NUC8i5BEH (Core i5-8259U) or NUC8i7BEH (Core i7-8559U).
Possible usage scenarios
So, what can you do with a PC with width and depth (4×4 inch, 10×10 cm) smaller than a CD case?
- Everyday computer – if your daily work doesn’t require huge CPU and GPU processing power, this PC is more than enough for browser and text-based stuff, including programming. Using small, energy-efficient PC is what I have been doing for several years now, booting up my “main” PC only for more demanding tasks like photo or video editing, watching demos or playing Battlefield 4 (in a random order).
- Home Theather PC (HTPC) – you can put this small box in your home cinema room and use it as a media center computer. It can playback 4K video and 7.1 audio. Install your preferred server like Kodi, Plex or Emby, and you’re ready to go. It has an infrared sensor and a stereo microphone built in, so you can use a remote controller or voice commands too (where available).
- Small home server – you can install any distribution of Linux and turn it into any type of server. Your own NAS, private cloud or backup server, anything you want. Using virtualization environments like KVM, Proxmox or vSphere Hypervisor, it is possible to turn this into a home lab and test your software or network setups. This option was my main reason for buying it.
Features
| Model | Intel NUC Kit NUC7i3BNH |
|---|---|
| Processor | Intel Core i3-7100U Processor (3M Cache, 2.40 GHz), max. 15 W TDP |
| Memory | DDR4-2133 1.2V SO-DIMM, max. 32 GB, max. 2 DIMMs |
| Graphics | Intel HD Graphics 620, integrated, HDMI 2.0a, USB-C (DisplayPort 1.2), max. 3 displays |
| Audio | Intel High Definition (Intel HD) Audio via the HDMI v2.0a and USB Type-C interfaces through the processor, Realtek HD Audio via Analog line-out / Analog Headphone / Analog Microphone (front panel jack), Digital microphone array (DMICS) connector (internal) |
| Storage | M.2 SATA / PCIe x4 lanes slot, SATA 6.0 Gbps port for 2.5″ SSD or HDD Drive, RAID-0 and RAID-1 are available for SATA ports |
| Peripheral Interfaces | 1x USB 3.1 (Gen 2) port via USB Type-C, 2x front and 2x rear USB 3.0, 2x USB 2.0 via internal headers, Consumer Infrared (CIR) |
| LAN | Intel I219V Gigabit Ethernet Controller 10/100/1000 Mb/s |
| Wireless | Intel Dual Band Wireless-AC 8265, Dual Mode Bluetooth 4.2, Wi-Fi Direct, Wi-Fi Miracast Source |
| Other | microSDXC with UHS-I support card slot |
| Recommended Customer Price | $279 |
What’s in the box
All right, enough of the theory, let’s go into practice. This is the content of the box.
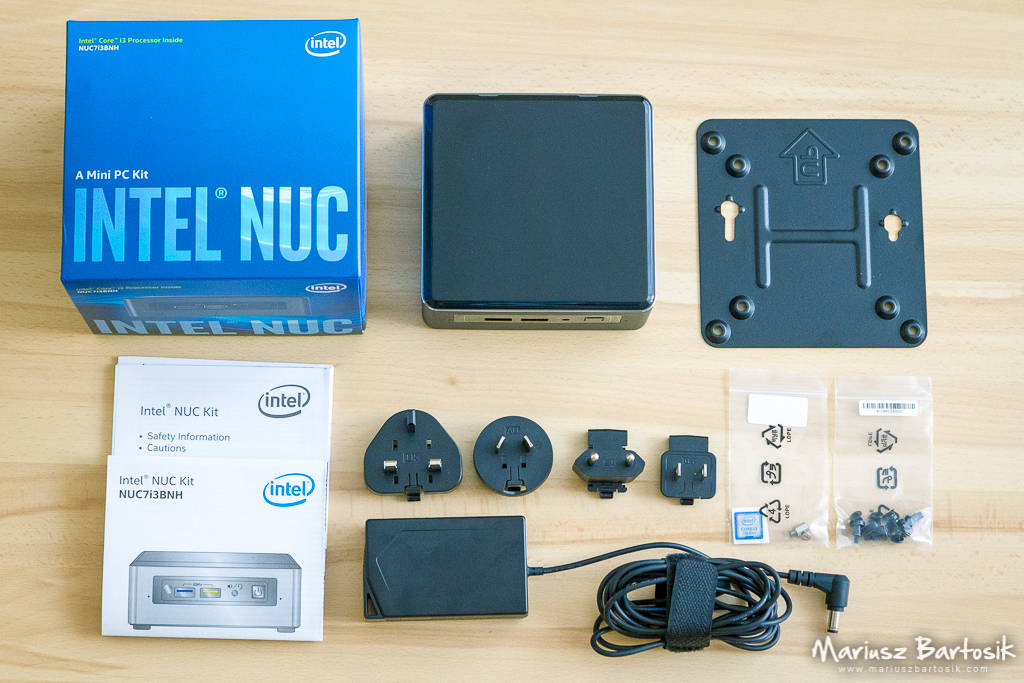
The NUC unit itself, an external power supply with interchangeable power plugs, so you can attach your favourite one (UK, AU, EU and US versions are provided), VESA mounting plate, some screws, usual papers including quick start guide, and a small sticker with Intel logo.
Outside view
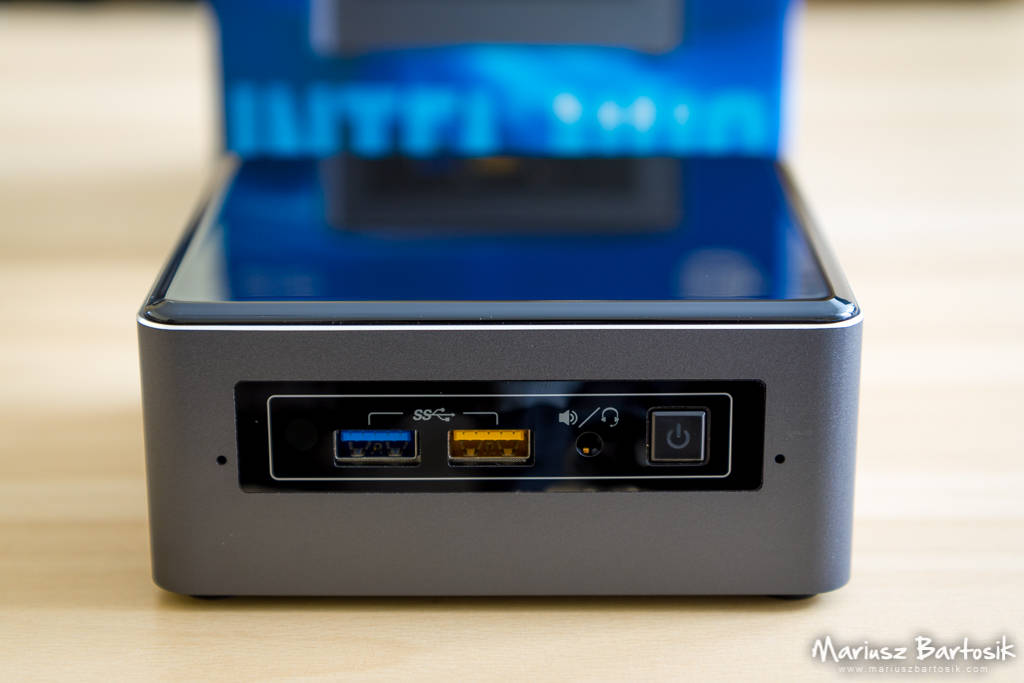
On the front panel, there is a barely visible Consumer Infrared (CIR) sensor, two USB 3.0 ports (the orange one is charging capable), 3.5 mm audio jack for speakers, headphones, microphone or combo mode (headphone/microphone), power switch. The two small holes are for digital microphone array. The border around the ports is a LED ring. You can configure its colour, brightness and what it indicates (like power state or drive activity). The same goes for the power switch.
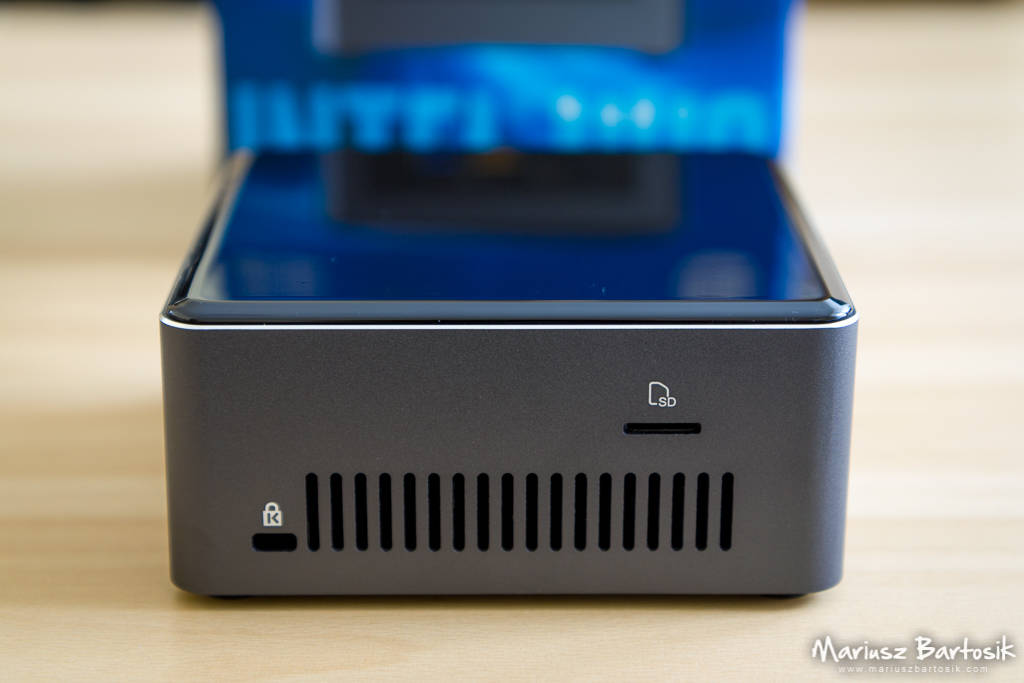
On the left side, there is a microSDXC card reader slot and the Kensington anti-theft key lock hole.
Nothing interesting on the right side.

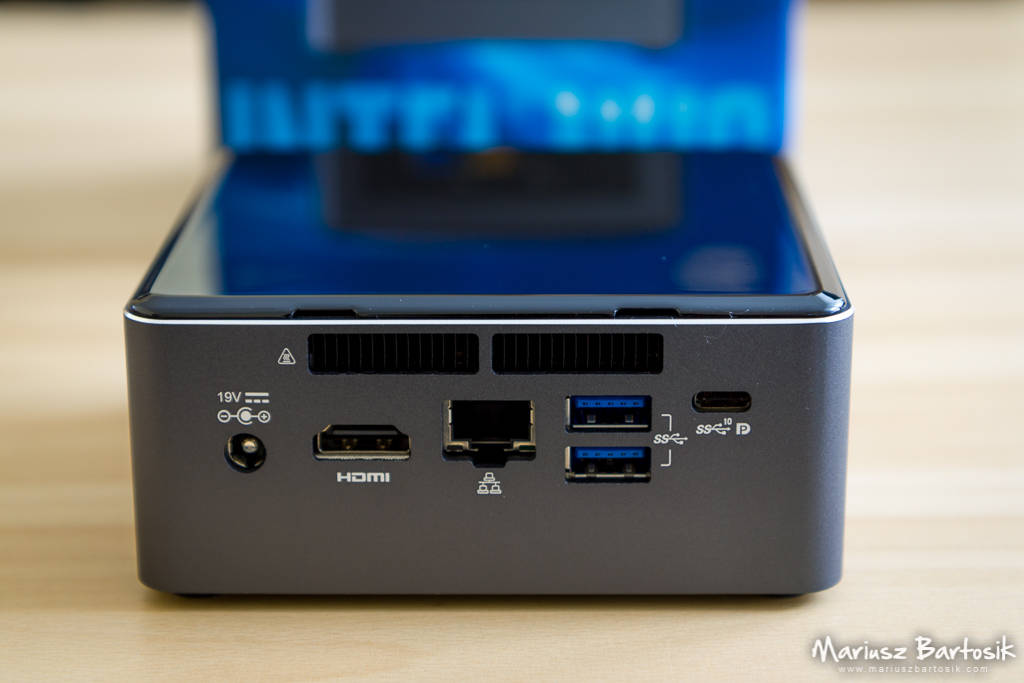
On the back side, there is a CPU fan output, 12-19 V DC input jack, HDMI connector, RJ-45 LAN connector with two LEDs, 2 USB 3.0 ports, USB 3.1 (Gen 2) Type-C connector. This can be used to send DisplayPort data too.
Assembly
…is easy. You have to flip the unit upside-down and unscrew the four screws. Remove the cover, and this is how it looks like:
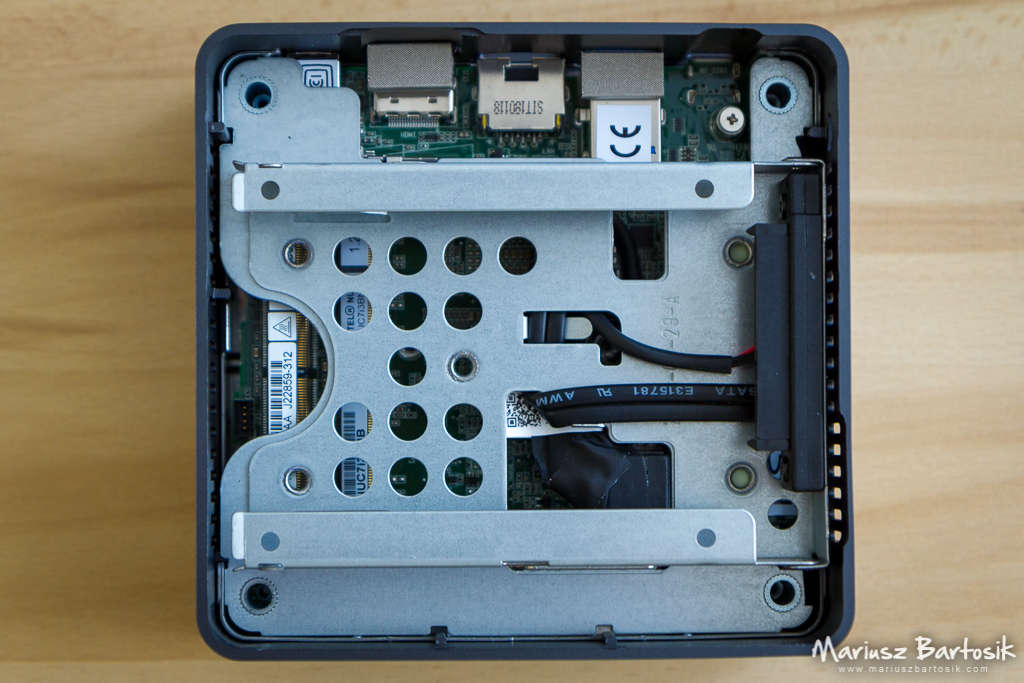
Chassis for 2.5″ disk can be removed, so you can install the memory and M.2 SSD. This can be done without disconnecting power and data cables from the motherboard, but I did it anyway to get a better view.

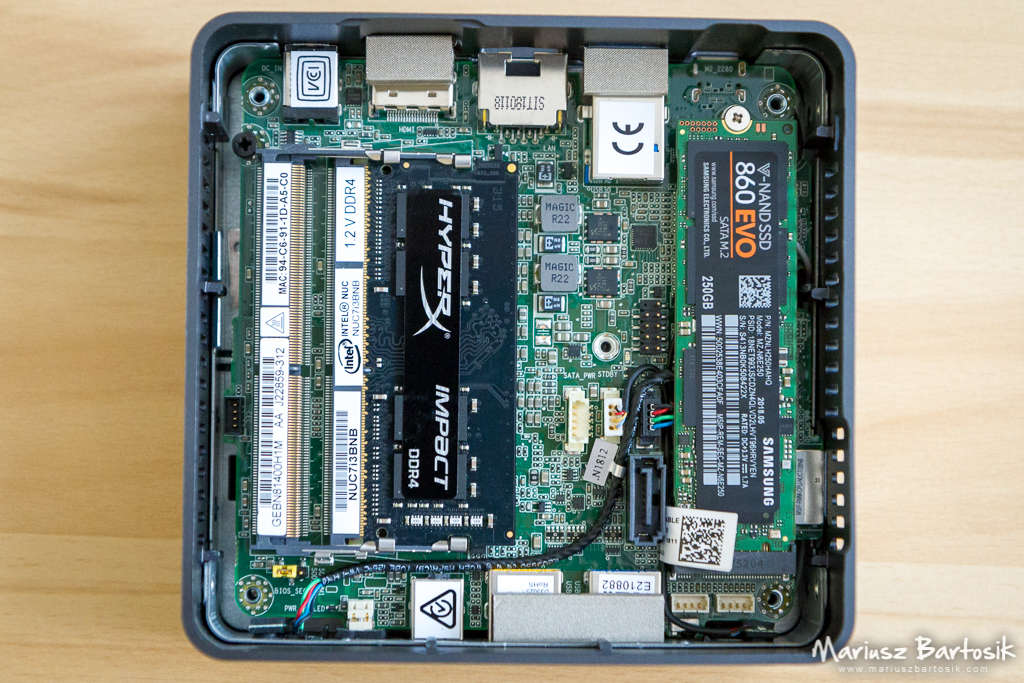
Two slots for SO-DIMM RAM modules, one for M.2 and one SATA port. I installed one HyperX 8GB 2133MHz DDR4 CL13 SODIMM Impact (HX421S13IB2/8) module, leaving one slot for future use. Samsung 860 EVO M.2 250GB (MZ-N6E250BW) landed in the M.2 slot.
I inserted an additional HGST TravelStar Z5K1 1TB (1W10028) HDD into the bracket and connected it to the motherboard. Before closing the cover and flipping it back, it looks like this:
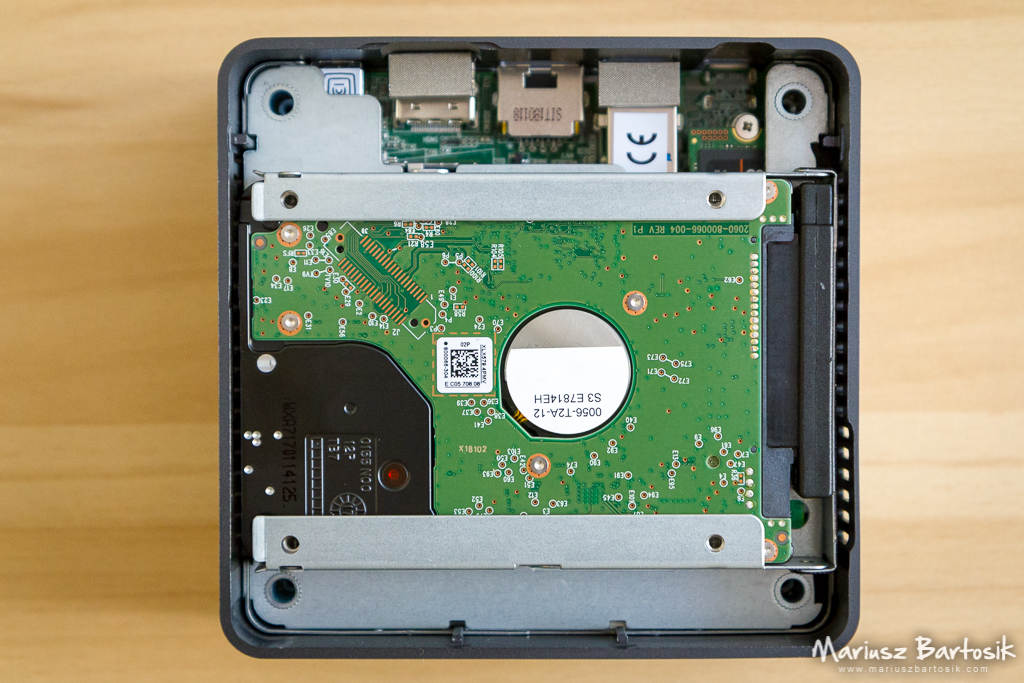
The entire operation should take less than 5 minutes (unless you cannot find your screwdriver).
BIOS settings
My unit had BIOS version 0060 BNKBL357.86A.0060.2017.1214.2013 installed, but a newer version was already available.
One of the changes was described as “Updated CPU Microcode and other security enhancements”, so this one probably addressed Spectre and Meltdown vulnerabilities. I was curious if this fix will affect CPU’s performance (some people were predicting hits like 15%), so I did initial tests and updated BIOS to version 0064 BNKBL357.86A.0064.2018.0529.1711. More on the results in the next section. You can get all the drivers and updates from Intel’s downloads for NUC Mini PCs page.
The BIOS is divided into 7 sections and corresponding subsections:
- Main – Date and Time, Processor and Memory information, Event Log,
- Devices – USB, SATA, Video, Onboard Devices, PCI and Add-In Config,
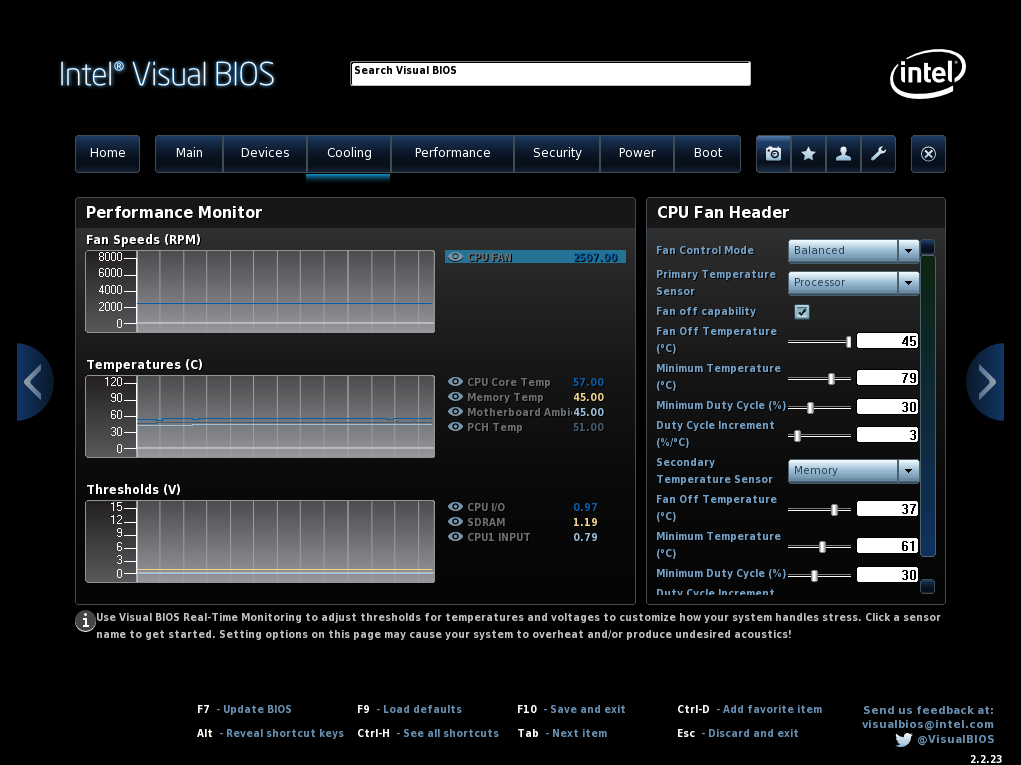
- Cooling – Performance monitor, CPU Fan Header,
- Performance – Processor, Graphics, Memory,
- Security – Password and Security Features,
- Power – Primary Power Settings (low power, balanced or max performance modes) and Secondary Power Settings (what happens after a power failure, colours and brightness of the power button and LED ring),
- Boot – Boot Priority, Boot Configuration, Secure Boot.
This is more than typical laptop’s BIOS with info section and boot order, and a bit less than BIOS of a desktop motherboard with overclocking capabilities. A nice thing is that you can set the temperature above which the fan will start operating. I like the ability to configure LEDs too.
Performance
It’s time to answer the most important questions: how fast is this small box? How much power does it need? And will it blend? I will provide you with an answer to the first two, leaving the third for someone else :)
I will compare it with other machines that I have access to. The full line-up is as follows:
- ZOTAC ZBOX-ID83 with Intel Core i3-3120M @ 2.50GHz – my current mini PC that I’m writing this review on,
- Intel NUC7i3BNH with Intel Core i3-7100U @ 2.40GHz – reviewed mini PC,
- ASUS UX410UA with Intel Core i5-7200U @ 2.50GHz – a laptop with the same CPU as in Core i5 version (NUC7i5BNH) of the tested model,
- Desktop PC with Intel Core i7-4770K @ 3.50GHz – my main PC, just for the reference, as this obviously will beat all the above energy-efficient CPU’s.
I performed all the tests on a fully updated Windows 10 version 1803, and after flashing the BIOS of the NUC to the newest version.
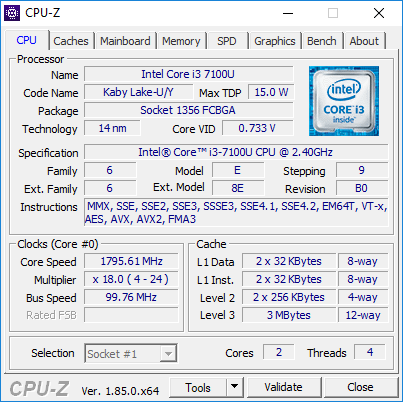
Before we begin, let’s check what info we can get on Intel Core i3-7100U in CPU-Z:
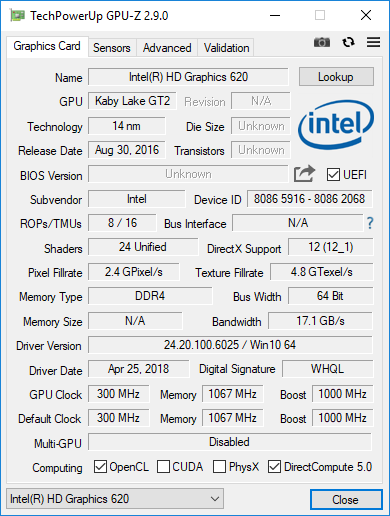
Let’s not forget about integrated graphics, Intel HD Graphics 620:
Maxon Cinebench R15
This is a free benchmarking program made by Maxon. They are well known from Cinema 4D, a 3D modelling and rendering software. BTW: the first versions of it were developed exclusively for Amiga computers.
Cinebench’s test uses all the CPU’s processing power to render a 3D scene with area lights, reflections, and shadows. You may think of it as just one frame from “No Keyframes” animation by Aixsponza.
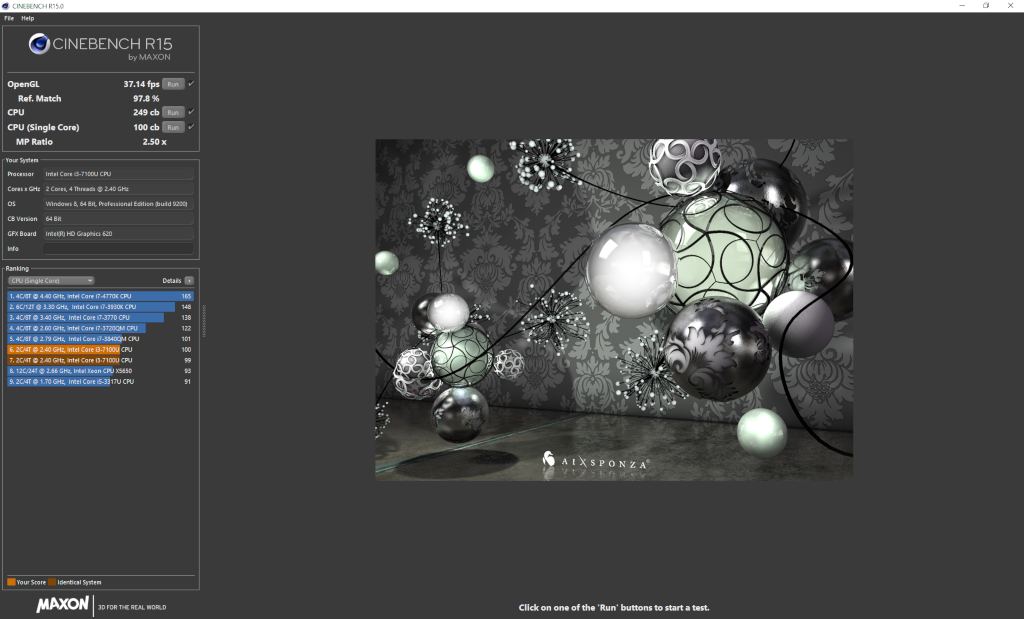
There are two modes in the CPU test; one uses all the available cores simultaneously, and the other one checks the performance of a single core. Results are represented in points, the more, the better.

Intel Core i7-4770K is a CPU from another league and is 3 times faster in multi-core operations than NUC’s Intel Core i3-7100U. But, as I said before, I included it only for a reference.
Cinebench can also measure the performance of a graphics card. All tested machines, except the Desktop PC, have GPU integrated inside the CPU. The test uses a 3D scene with nearly 1 million polygons, textures, bump maps, transparency and lighting. Results are in frames per second, and more is better.
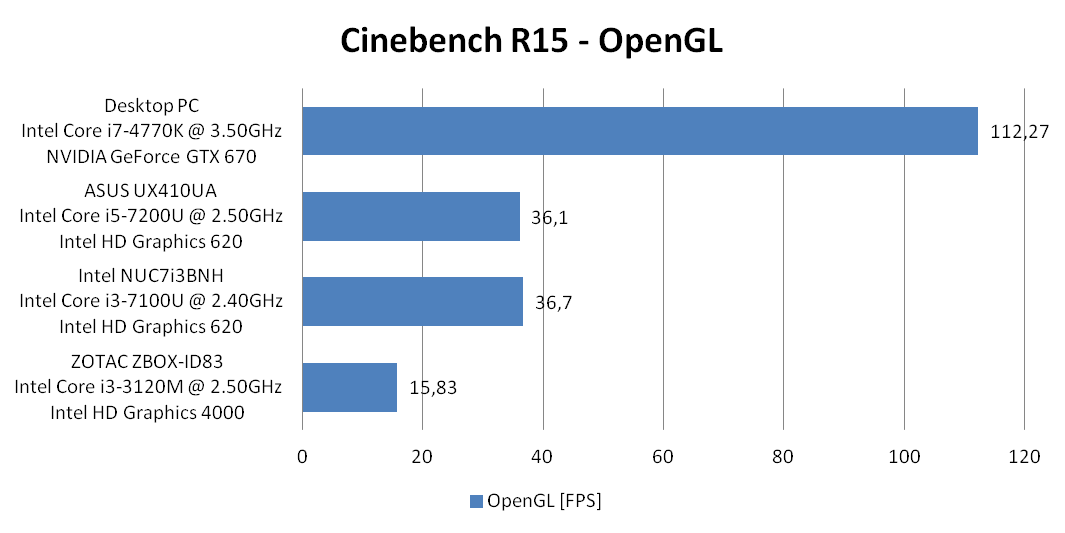
Both Intel Core i5-7200U and Intel core i3-7100U have the same graphics unit built-in, so the results are similar. Intel HD Graphics 620 seems to be over 2 times faster than Intel HD Graphics 4000 used in the older generation. Again, integrated GPUs are no match for a separate graphics cards, at least in terms of performance.
Geekbench 4.2.3
This is another popular benchmarking program created by Primate Labs. There are versions for Windows, macOS, Linux, Android and iOS, so you can compare a wide range of devices. I used Geekbech in a free, tryout mode. The first test gave the following results in points. More is better.
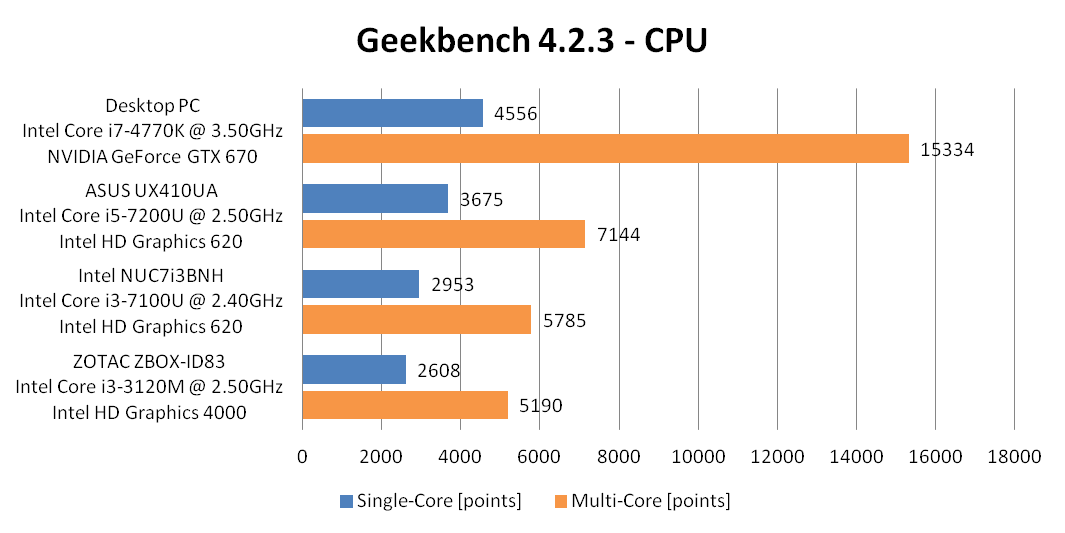
These scores scale linearly, so CPU with 4000 points has the double performance of a unit scored 2000. You can check out a score of your processor without installing any software in Geekbench Processor Benchmark Chart.
The second test uses GPU to perform compute tasks like face detection, histogram equalization or particle physics. Just as for the CPU, Geekbench OpenCL Benchmark Chart is also available. Currently, Tesla V100-SXM2-16GB is leading with 415370 points. Our test units managed to get the following scores (more is better):
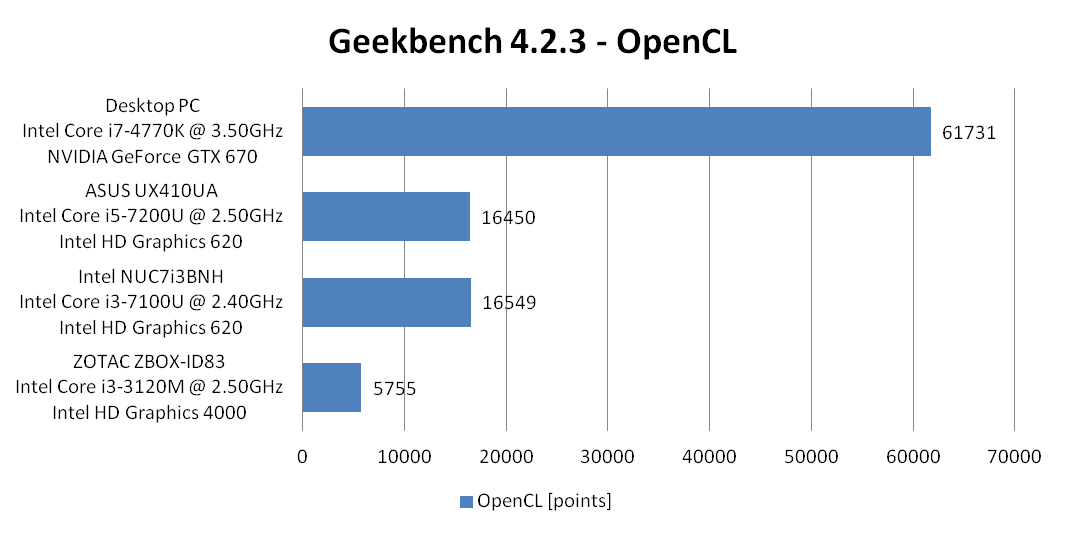
Somehow tested NUC got more points than a laptop with a better CPU but the same GPU, but I think we can assume that this difference was in a margin of error. Again, these low-power units are not the best candidates for your new cryptocurrency mining PC. On the other hand, they will keep your energy bills low.
Spectre and Meltdown patch
All the tests were performed on a fully patched BIOS and Windows, but I also ran them before applying BIOS upgrade with “Updated CPU Microcode and other security enhancements”.
| Before | After | Change | |
|---|---|---|---|
| Cinebench R15 – Multi-Core | 256 | 250 | -2,40% |
| Cinebench R15 – Single-Core | 98 | 99 | 1,01% |
| Cinebench R15 – OpenGL | 37,59 | 36,7 | -2,43% |
| Geekbench 4.2.3 – Single-Core | 2978 | 2953 | -0,85% |
| Geekbench 4.2.3 – Multi-Core | 5852 | 5785 | -1,16% |
| Geekbench 4.2.3 – OpenCL | 16563 | 16549 | -0,08% |
Indeed, almost all of the results were better before patching, but as you can see, the difference is negligible, and on the edge of measurement error. So, I wouldn’t worry about this, at least in a pure computing scenario, without I/O operations.
Power consumption
You probably noticed that I talked about power consumption here and there. So, let’s compare this. Results are in Watts, this time lower is better:
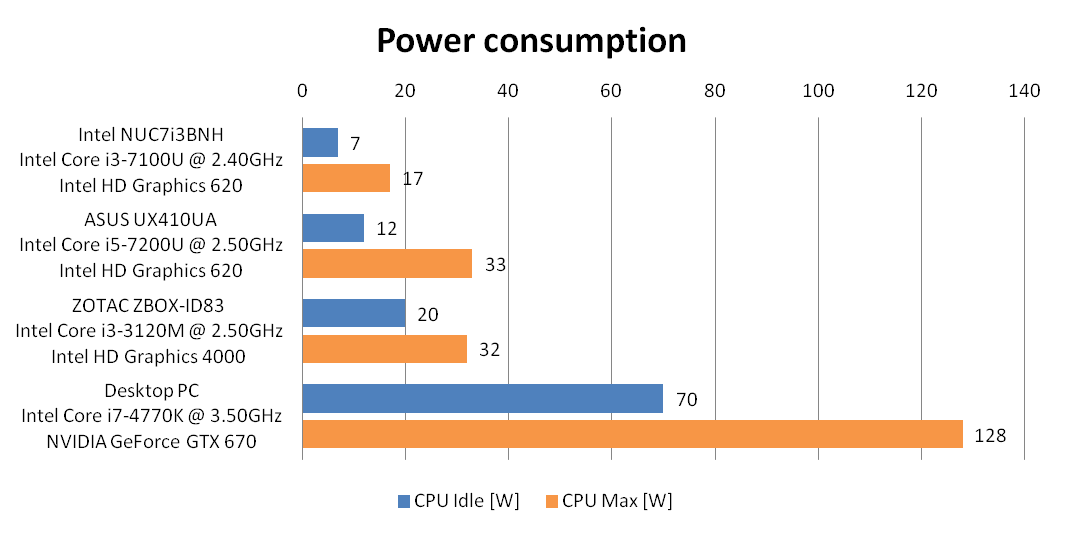
CPU Idle score is the lowest measurement I could get after Windows booted into the desktop, making sure it didn’t start any background task like anti-malware scanner.
CPU Max measure was taken while performing the multi-core test in Cinebench. Notice that it is not the overall maximum power that the whole system can draw from the socket. This test doesn’t use GPU, so in reality this can be higher during demanding operations. For example, the Desktop PC can take more while playing games (let me test this for you… [2 hours later] yeah, it’s like 255 W in Battlefield 4) or using some processing-power-hungry software.
Two more notes: NUC has two drives installed, so you can expect even slightly lower results with just one drive. Also, laptop’s power consumption at the socket did change, but I’m not sure if it was really bypassing the built-in battery that I couldn’t remove. The results look reasonable, though.
Real life use
Windows
After pushing the power button, you have to wait about 20 seconds to see the Windows logon screen. Even standard speed SSD drive is enough to use a web browser, office programs and other utilities in a comfortable way. I didn’t encounter any slowness or other annoyances here.
Linux
Once again, installing Linux server (Debian 9, in my case), went smoothly. I was able to set up private cloud, media and other servers without any problems. However, during routine logs review, I found the following entries:
firmware: failed to load i915/kbl_dmc_ver1_01.bin (-2)
Direct firmware load for i915/kbl_dmc_ver1_01.bin failed with error -2
Failed to load DMC firmware [https://01.org/linuxgraphics/intel-linux-graphics-firmwares], disabling runtime power management.
DMC provides additional low-power idle states for integrated graphics. The easiest fix is to download this file and place it in /lib/firmware/i915 directory:
wget https://git.kernel.org/pub/scm/linux/kernel/git/firmware/linux-firmware.git/plain/i915/kbl_dmc_ver1_01.bin
mv kbl_dmc_ver1_01.bin /lib/firmware/i915/
On the next boot, these warnings should be replaced with just a notification:
firmware: direct-loading firmware i915/kbl_dmc_ver1_01.bin
[drm] Finished loading i915/kbl_dmc_ver1_01.bin (v1.1)
BTW: This small file is also part of the firmware-misc-nonfree package.
Games
All right, this is not a machine capable of running AAA games with their quality sliders set to “ultra”, but I just had to do this. Obviously, an integrated GPU is the main bottleneck here.
In Battlefield 4, after setting the screen resolution to 1280×720 and most of the quality settings to “low” or “medium”, you can get 20-30 frames per second on large maps.

It can jump to 40 FPS if there is not much to render on the screen. This is enough for playing tanks, jets or Commander Mode. In a close quarters combat, your opponents will have an advantage of faster response times on their machines running 100+ FPS.

Even at 40 FPS, the game still shows the result in red. The official minimum requirement for a graphics card is NVIDIA GeForce GTX 660 or AMD Radeon HD 7870. Their scores in Geekbench OpenCL benchmarks are 42874 and 77611. That’s over 3 times more than this NUC’s low energy GPU can provide.
I got better results with Dirt 3. I managed to run it in 1920×1200 resolution and low quality at 30 FPS, but there was a small delay in car’s reaction. After setting screen’s resolution to 1280×720, the game was able to render 50-60 FPS and was playable.

So, even if this NUC wasn’t built for playing 3D games (check out the Skull Canion and Hades Canion models for that), you can run some older ones on it. And if you are a fan of simpler, casual games like point&click adventures or logical games that don’t need high framerates, they should run perfectly fine. For example, I tested a solitaire variant (harder, but more satisfying) in SHENZHEN I/O game, and didn’t notice any lags at all ;)

Demos
Just like with games, this NUC’s integrated GPU will limit the framerate of more demanding demos. I checked some older classic demoscene productions and was not dissapointed with their performance.
You can watch Debris by Farbrausch in 1280×720 with 2xMSAA at 25 – 40 FPS.

Andromeda & Orb’s Stargazer ran smoothly at 60 FPS with 1280×720 screen resolution:

Heck, I even ran our 10 years old Hugi#35 Headlines – Disruption in Chaos Theory demo with a benchmark option turned on (I probably made it just for the purpose of this review :). The result was 104 FPS at 1280×720 screen resolution.

HTPC
It’s easy to turn this NUC into Home Theatre PC with Plex, Kodi or any other media server. Just install the software, copy your movies and music collection on it and you are ready to stream them to any other device on your network or even outside of it (like your phone).
I don’t collect movies, so I created a music library instead. I didn’t have any problems here, except that in Windows, Plex Media Server starts after user logs in, and not as a system service. This may be inconvenient for many people. Later, I tested the Linux version on a Debian server installed on this NUC, and it worked as expected.

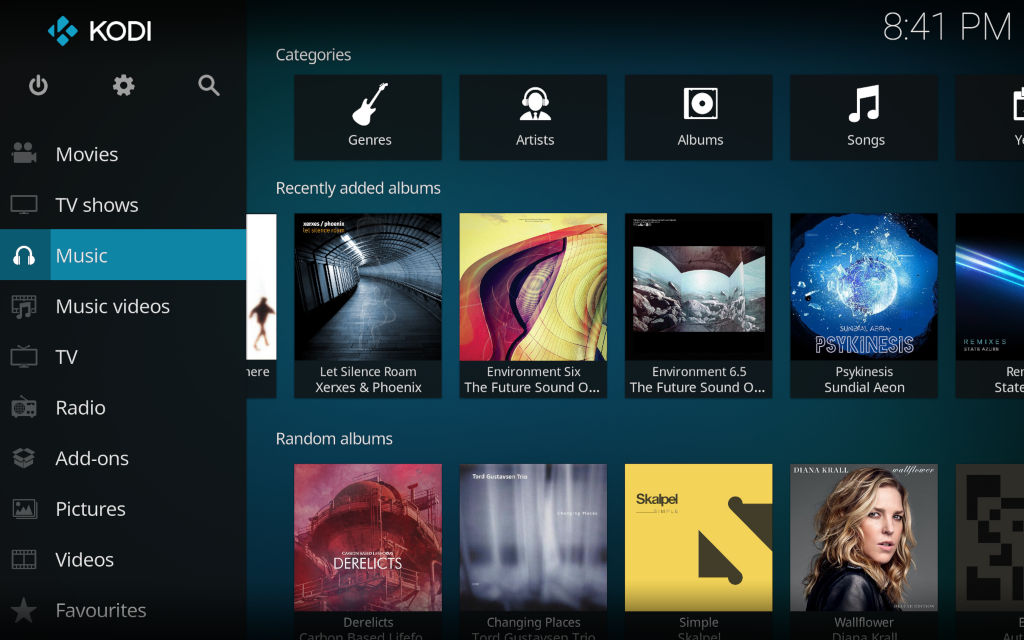
No problems with setting up Kodi too:
I also did a small test of 4K video playback, and the CPU is fast enough to play the samples I found on the internet. They had to be scaled down to 1920×1200 though, as I don’t have a 4K HDR TV to test them on (as a matter of fact, I don’t have any TV at all).
As you probably noticed, so far I’m happy with the features of this NUC. But it’s time for something I don’t like: the lack of an optical audio output. Of course, you can send digital audio via HDMI or USB type C, but not all audio hardware supports that. There are other options though; using DLNA to send it through a network to an audio renderer device or plugging an external sound card like this one:
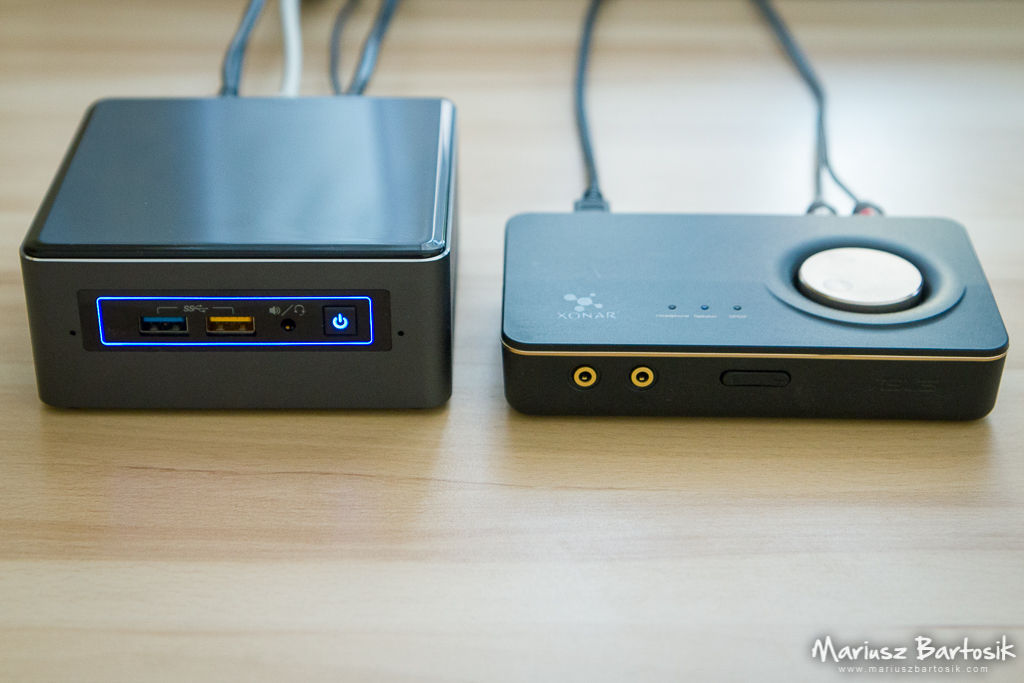
This way you can get a better analog sound quality than with built-in Realtek HD codec. But it’s still a waste of space if you only want to use its S/PDIF output to send audio data to even better hardware.
Summary
I’m still impressed that this NUC was really quiet even under 100% CPU usage. That’s just the opposite of ASUS UX410UA and its fan that kicks in for no reason. Low power requirement is another great thing if you want to set up a home server turned on 24/7. At the same time, it’s powerful enough to use it as a daily computer for office work, programming, web browsing, watching movies and listening to music.
After making all these tests, my current dilemma is, that I probably should use this NUC as a daily PC and recycle my old ZBOX as a home server instead.
I really would like to have an optical output on the back of this NUC, but this is a minor drawback. Other than that, I can fully recommend this mini PC.


i am going to buy a mini pc
i7 8th gen 32gb ram and 512gb ssd
do u recommend me use this configuration for an REMOTE DESKTOP SERVER for 16 users??
It depends on what programs your users will want to run on their remote desktop, what operating system you are going to use, etc. You should be prepared for the worst case scenario; all the users logged in, using their most resource-hungry software. Will 2 GB of RAM per user be enough? How about 1/16 of the computing power of this laptop-class, energy efficient CPU? The same with disk space.
For some light work and not all users constantly logged in, such configuration might be enough. For some serious workload I would recommend some hardware with more than 32 GB of RAM, maybe some Intel Xeon CPU and better cooling.
Hi Mariusz
thanks for the detailed review. it was super helpful.
I have the Intel NUC7i3BNH running linux currently. I need to convert it into a dual boot setup with windows and linux. As per Intel the device only support windows 10 (officially). I am interested in running windows 7 on it for legacy reasons. Do you know if that’s possible.?
I have found a way to add usb 3.0 dupport to windows 7, but am wondering if there might be issues with teh other drivers, eg vido, wifi, etc.
Any thoughts on this? Your help would be much appreciated,
thanks again
jim
Hi Jim,
I just removed SSD and HDD from my NUC, connected a spare SSD and booted Windows 7 Pro installation from a pen drive. Unfortunately, after a couple of seconds, it freezes on an installation screen with animated Windows logo. Later I even burned a DVD disc and repeated the process, but the result was the same.
I also tried to install it on 8th gen NUC8i3BEH that I’m currently testing, but no luck with this one too.
Maybe a trick with installing it on a different machine and then putting this disc inside your NUC would do, but I guess that Intel had a reason to list it as not supported.
Hi Mariusz,
I wonder if Dual band AC8265 wireless card is able to perform Miracast source (WiFi Direct).
Is this a feature that you can customize? I mean, NUC propagate a Miracast SSID on a specific channel and with a specific power.
This could be really an annoyance if you have a WiFi (corporate or personal) on the same band. Is it possible to tune the channel and power of Miracast source ?
Thx a lot
Hi Marcus,
I managed to stream NUC’s screen to another device. Using “Connect” option in Windows’ Action Center (WIN+K) I was able to cast video and audio to a laptop. No problems with reversed setup too. I got mixed results with casting from Android smartfones to NUC. Some complains about protected content (HDCP) has occured, but that depends on smartphone’s manufacturer.
I haven’t found any options to customize Miracast in Windows 10 except some basic security tweaks. Intel has discontinued their Wireless Display (WiDi) applications, so I couldn’t check their alternative. I think that the creators of the standard made sure that it did not introduce any interference into other wireless communication around.
Thx Mariusz,
I can see that the power in dBm is strong so for sure Miracast streaming can interfere with a common WiFi in 2.4GHz band.
Maybe there is a way to customize power and channel in the registry? I will take a look.
Thx